Workstation Introduction - Function
1.Clean fluid inlet: Add cleaning solution
2. Water inlet: Provide the robot with an automatic water filling port for adding
clean water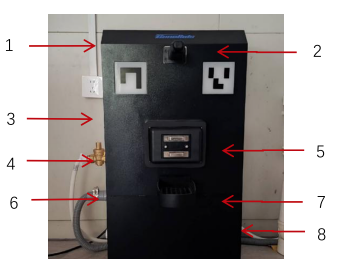
3. Clean water gun: Water gun for cleaning the machine's wastewater tank
4. Clean water pipe: Freshwater inlet pipe for the workstation
5. Charger head: Mechanism for automatically charging the robot
6. Drainage pipe: Interface for discharging wastewater from the workstation
7. Sewage outlet: Water collection tray for the robot to discharge wastewater into the workstation
Introduction - All Components
•Workstation clean water inlet accessories: Accessory 1: water inlet + Accessory 2: water inlet fixing piece.
•Workstation clean water inlet pipe components: Accessory 3: clean water pipe + Accessory 4: pressure regulator.
•Workstation wastewater discharge pipe components: Accessory 5: drainage pipe + Accessory 6: quick interface and clamps.
•Workstation fixing components: Accessory 7: sheet metal fastening + Accessory 8: fixing screws.

Workstation-Installation
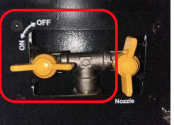
STEP 1: Install Accessory 1 and Accessory 2 on the top water inlet of the workstation.The valve
should be fully open.
STEP 2: Install accessory 3 and accessory 4 on the side fresh water inlet of the workstation.
STEP 3: Install accessory 5 and accessory 6 on the side sewage drain outlet of the workstation.
STEP 4: Adjust the inlet valve of the workstation (on the left side) and observe if there is any
water leakage.
Note: • When connecting the water pipe threads, please be sure to add thread seal tape to prevent
water leakage.
• The temperature of the clean water should be kept below 45 degrees Celsius.
• Please close the inlet valve if the indoor temperature is below 0 degrees Celsius.
Workstation Testing (After Installation)
STEP 1: Plug in the power cord of the workstation and turn on the air switch on the right control
unit of the workstation.
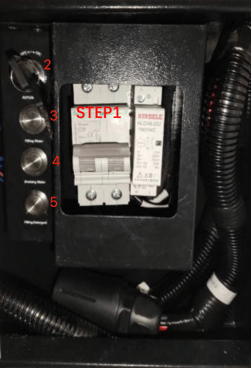
STEP 2: Set the mode control key button to "Manual" (ON).
STEP 3: Hold down the "Filling water" button and observe if the workstation's water inlet is
dispensing clean water in an appropriate amount.
STEP 4: Pour a bottle of 500ml water into the sewage pan. Then, hold down the "Draining water"
button and observe if the water is being discharged from the workstation's drainage pipe.
STEP 5: Pour a bottle of 500ml water into the cleaning liquid port. Then, hold down the "Filling
Detergent" button and observe if water is being dispensed from the workstation's water inlet.
Note: After the test is completed, please restore the key switch to the automatic mode (OFF). If
the mode is not restored, the workstation indicator lights will start to blink
Fixed Workstation
1. Workstation height adjustment: Adjust the feet cups at the bottom of the workstation to ensure that the charging contacts of the workstation are parallel to the robot's brushplate, without any height difference.
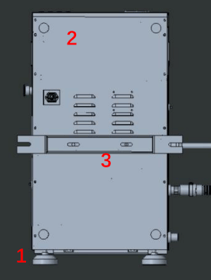
2. Workstation wall adjustment: Adjust
the feet cups behind the workstation to ensure
that the workstation is closely aligned with the wall, without any gaps.
3. Workstation wall mounting: If you need to mount the workstation on the wall, please
use accessory 7: fixed sheet metal bracket and accessory 8: fixing screws. The specific
positions are shown in the diagram.
Workstation Maintenance(Monthly)
After long-term operation, sediment and dirt may accumulate in the
sewage buffer tank of the base station, which requires monthly cleaning.
The cleaning procedure is as follows: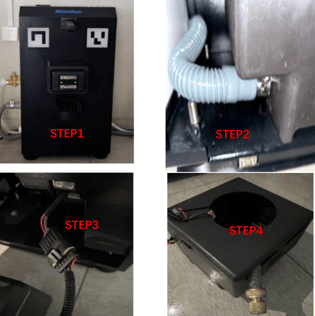
STEP 1: Open the protective panel below the base station. This panel is in
magnetic absorption mode, making it easy to remove and install.
STEP 2: Disconnect the connection between the left side of the water tank
and the drainage pipe.
STEP3: Disconnect the electrical connector on the right side of the water
tank.
STEP 4: Pull out the water tank to remove it for cleaning. The pump inside
the water tank is waterproof and can be directly cleaned with water
without disassembling. After rinsing, reinstall the water tank following the
original steps.
Note: Before pulling out the sewage tank, make sure to disconnect the
electrical connection to avoid damaging the cables.